")
Microgreens may well be one of the answers to feeding a growing population.
It’s estimated that global food production will have to rise by 70% to feed a likely 10 billion people on the planet by 2050. Unfortunately, urban house building and industrial development appears to exacerbate the situation. Removal of agricultural land and the need for more irrigation water means that other methods of generating plant food is needed hence the role for microgreens.
What Are Microgreens?
Microgreens are the edible cotyledons, hypocotyl and true leaves of grains, herbs, grasses and various flowers.
In past years microgreens have received a dubious press. Food for fancy restaurants and high-end recipes where a sprinkle of overpriced small leaves has been seen as a cultural fop. Indeed when they adorn our upmarket restaurant plates we might think of them as the top of the culinary pyramid. Nowadays we might have to put these thoughts aside as alternative farming practices gain credence.
The idea took root in the 1980s in San Francisco where chefs were looking for greater novelty. The tiny fairy leaves added colour and texture to bland looking savoury and even dessert dishes. What the chefs hadn’t anticipated was the higher levels of vitamins, minerals and other nutrients that were being pumped into the leaves. Some producers have found the amount of minerals and vitamins as well as other health beneficial phytonutrients can be 50x higher.
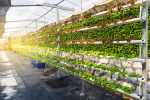
Throughout the world different forms of Controlled Environment Agriculture (CEA) have take root. Aquaculture, hydroponics, aeroponics and microgreens are all part of this new farming practice. One of the benefits of microgreens is that it lends itself well to indoor growing. Such produce appears to offer viable alternatives and its not surprising to see new initiatives from the European Innovation Council that focus on this technology.
In the USA, greenhouse fresh produce was worth $4 billion in 2020 and a significant portion of this came from hydroponic farming. The other feature was vertical farming which includes hydroponics. It should be the case that there are lower food safety issues. No contamination by wild animals, no soil contact, no contamination by wind-blown microorganisms or genetically modified agents for example. It isn’t as straightforward as this.
Growing fresh microgreens for example involves potential contamination with cultivation water, nutrients and the need for human handling and conveyance. Contaminated seeds and the developing aerial parts of a plant can contain foodborne pathogens. It is worth making sure that good safety practice is kept up to avoid potential contamination.
What Do We Recommend For Growing?
- Vegetables: beets, beans, broccoli, cabbage, cauliflower, kale, peas, radishes.
- Lettuces with greens: mustards, tatsoi, rocket (arugula), chard, collards, kale, spinach.
- Herbs: basil, coriander (cilantro), dill, mints, marjoram & oregano, sage, thyme.
- Grasses and grains: alfalfa, barley, buckwheat, flax, wheatgrass.
- Flowers: chrysanthemum, nasturtium, sunflower.
Growing Microgreens At Home
Now you can easily grow these little greens at home. They are not sprouts, which is a different type of plant growth, but seedlings. they include our everyday edible plants such as herbs, lettuce, leafy greens, salads, flowers, grains and grasses.
The big difference is these are all grown and then harvested after a week or more. That’s a tender age for such a plant but it has a different nutrition level compared to what they might develop into later on.
A wide selection of starter cultivation kits are available, complete with seeds, growing media and trays to start them off in. If you really are feeling green and into upcycling or reuse then a plastic tray with holes in is a good start. We’ve used any shallow tray, be it aluminium, plastic, etc. Those pie plates are good and so are the vegetable packs that had last week’s leeks.
The container contains an inch of good quality potting compost or a sterile soilless medium. We often water beforehand because dry compost can get everywhere and it helps with seed germination. Sprinkle a few seeds on the surface and cover the whole lot with a thin layer of the medium. Tamp down (i.e. firm with a lid say) to keep the seeds in place.
Continued watering over the whole of the tray or container is necessary. Keep at a warm temperature – 15 to 21 Centigrade (65-75°F) and in the light for between 4 and 6 hours should be enough. It needs to be even in dark Winter months.
The soil needs to be kept moist but not soaking. Misting will certainly help. Do this at least once if not twice a day. Avoid letting the surface of the compost dry out too much. It’s easy for me to say this but after a few tries it becomes obvious to the grower what level of moisture is needed.
The seedlings should appear after a week. The cotyledon or seed leaves are seen first. The second or true leaves follow a few days to a week later. The plant will be an inch or two in height and ready for harvesting. the stems are snipped just above ground level.
the microgreens will keep in a sealed bag in the fridge for up to a week. Ideally rinse after snipping and eat immediately.
If you miss a snip then not to worry, these greens keep on growing and slightly larger plants can be harvested. I’ve even grown on just to get the full benefit of slightly larger leaves for bigger salads.
Replace the crop with further leaves to get maximum benefit from space. After 4 crops it will mean replacing some of the soil but not all of it because poorer soil often promotes good growth. The medium can get green and mouldy on the surface so we get rid of the top layer after awhile.
Leave a Reply