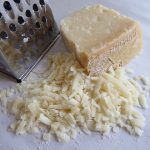
Karish cheese (or Kareish cheese) is a traditional, low-fat, soft white cheese that originates from Egypt. It has ancient roots, dating back to the Pharaonic era, and remains popular in Egyptian cuisine today, especially in rural areas. Let’s break it down:
🧀 Production Process
Karish cheese is typically made from skimmed milk — often buffalo or cow’s milk — which has been curdled using natural fermentation or by adding rennet. The steps generally include:
- Milk skimming: The milk is allowed to sit so the cream rises to the top and is removed, leaving skimmed milk behind.
- Coagulation: The skimmed milk is left to ferment at room temperature or mixed with rennet to curdle.
- Draining: The curds are cut and drained in special reed mats or cheese molds lined with cloth, allowing the whey to escape.
- Salting and shaping: The curds are salted and sometimes pressed into blocks or rounds.
- Aging: While it’s often consumed fresh, some versions may be left to mature for a short period to develop flavor.
🍽️ Taste and Texture
- Taste: Tangy, slightly salty, with a clean and milky flavor.
- Texture: Soft and crumbly, somewhat like feta but less creamy.
🌿 Culinary Uses
Karish cheese is a staple in Egyptian breakfasts and mezze platters. It’s often paired with fresh vegetables (tomatoes, cucumbers, spring onions), drizzled with olive oil, or mixed with herbs. Popular ways to serve it include:
- With feteer meshaltet: A flaky pastry.
- In salads: Combined with fresh greens and onions.
- As a spread: On bread, with a sprinkle of black seeds or cumin.
⚖️ Nutritional Value
Karish is a great source of protein and calcium but is relatively low in fat due to the skimming process. This makes it a healthier alternative to other full-fat cheeses.
- Protein: Helps with muscle repair and overall health.
- Calcium: Supports bone health.
- Low fat: Suitable for those watching their fat intake.
Making Karish At Home
🌿 Ingredients:
- 2 liters (8 cups) skimmed milk (cow or buffalo milk works best)
- 2 tbsp lemon juice or vinegar (for curdling)
- 1 tsp salt (adjust to taste)
- Optional: herbs like nigella seeds, cumin, or thyme for extra flavor
🏺 Equipment:
- Large pot
- Cheesecloth or a clean muslin cloth
- Strainer or sieve
- Bowl (to collect the whey)
- Weights (like a jar of water) to press the cheese
🧀 Method:
-
Heat the milk:
Pour the skimmed milk into the pot and gently heat it over low to medium heat until it reaches about 40°C (104°F) — warm but not boiling. Stir occasionally to prevent burning. -
Curdle the milk:
Add the lemon juice or vinegar and stir gently. You’ll notice the milk starting to separate into curds (solid) and whey (liquid). Remove from heat and let it sit for about 10–15 minutes. -
Strain the curds:
Line a strainer with cheesecloth and place it over a bowl. Pour the curdled milk into the cloth, letting the whey drain out. -
Salt and season:
Sprinkle the curds with salt and, if desired, add herbs like nigella seeds or cumin. Mix gently. -
Shape and press:
Gather the cheesecloth’s edges, twist them together, and tie securely. Place the wrapped curds under a weight (a jar of water works) for 4–6 hours to drain more whey and firm up the cheese. -
Unwrap and store:
Once firm, unwrap the cheese. It should have a soft, crumbly texture. Store in an airtight container in the fridge for up to 5 days.
🍽️ Serving Suggestions:
- Traditional breakfast: Serve with chopped tomatoes, cucumbers, and a drizzle of olive oil.
- Spread: On warm bread, sprinkled with black seeds.
- Salad topping: Crumble over a fresh salad for a tangy twist.
Leave a Reply