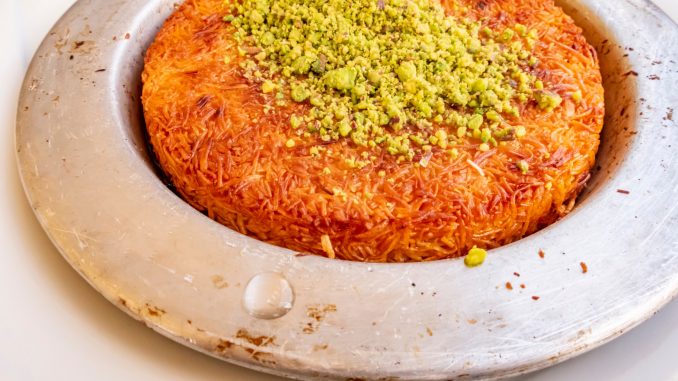
Kunafa, also spelled knafeh, kunefe, kanafeh, or konafa, is a beloved and iconic Middle Eastern dessert that has captivated taste buds for centuries. This delectable pastry is known for its contrasting textures, combining layers of thin shredded pastry with a luscious filling and sweet syrup. As we delve into the world of kunafa, we’ll explore its origins, the art of making it, the diverse variations, and the cultural significance that makes it a cherished delicacy across the Middle East.
Origins and Historical Roots
The roots of kunafa can be traced back to the Middle East, with claims that it originated in the city of Nablus in the West Bank. This city is often regarded as a stronghold for the production of high-quality kunafa. Over time, the dessert has spread across the Middle East, becoming a staple in various countries, each adding its own unique twist to the recipe.
Key Components of Kunafa
1.Shredded Pastry (Kataifi): The foundation of kunafa is the shredded pastry, known as kataifi or knafeh dough. It is made from wheat and water, creating fine, thread-like strands. These strands are often used to encase the filling, contributing to the dessert’s distinctive texture.
2. Filling: Kunafa can have a variety of fillings, adding both flavor and richness. One of the most common fillings is a mixture of sweetened, unsalted white cheese, such as akkawi or mozzarella. Some variations use a combination of nuts, such as pistachios or walnuts, adding a delightful crunch.
3. Sugar Syrup: A crucial element of kunafa is the sweet syrup that is poured over the pastry after baking. This syrup, often flavored with orange blossom or rose water, adds sweetness and moisture to the dessert, enhancing its overall indulgence.
4. Butter or Ghee: Butter or ghee is used generously to coat the shredded pastry, contributing to the pastry’s crispiness and golden brown color during baking.
Making Kunafa
The art of making kunafa involves a meticulous process that requires both skill and patience. Here’s a simplified step-by-step guide:
1. Preparing the Shredded Pastry:
- If using store-bought kataifi dough, it usually comes frozen. Allow it to thaw in the refrigerator before use.
- Separate the strands gently with your fingers, fluffing them up to create a light, airy texture.
2. Preparing the Filling:
- The filling can vary, but a common choice is a mix of sweetened white cheese. Some recipes also incorporate a layer of ground nuts or a nut mixture for added flavor and texture.
3. Coating with Butter:
- Melt butter or ghee and generously coat the shredded pastry with it. This step is crucial for achieving the desired crispiness and golden color during baking.
4. Layering:
- Layer half of the shredded pastry in the bottom of a baking dish, pressing it down to create a firm base.
- Add the cheese or nut filling evenly over the shredded pastry.
- Top with the remaining shredded pastry, ensuring an even distribution.
5. Baking:
- Bake in a preheated oven until the kunafa turns golden brown and crispy. The baking time can vary, so keep a close eye on it.
6. Sweetening with Syrup:
- While still hot, pour the cooled sugar syrup evenly over the baked kunafa. The hot pastry readily absorbs the syrup, infusing it with sweetness.
7. Resting Period:
- Allow the kunafa to rest for some time before cutting it into squares or diamonds. This resting period allows the flavors to meld and the pastry to set.
Variations
Kunafa comes in various regional variations, each offering a unique twist on the classic. In the Levant, you might find a version filled with sweetened clotted cream or a mixture of semolina and sugar. In Turkey, the dough may be layered with pistachios and clotted cream. The diversity of kunafa reflects the rich tapestry of Middle Eastern cuisine.
Cultural Significance
Kunafa is more than just a dessert; it holds cultural and social significance across the Middle East. It is often associated with celebrations, festivities, and special occasions, symbolizing hospitality and generosity. Serving kunafa to guests is a gesture of warmth and hospitality deeply embedded in Middle Eastern traditions.
In conclusion, kunafa is a culinary masterpiece that transcends time and borders. Its intricate layers, contrasting textures, and aromatic syrup make it a dessert that not only satisfies the sweet tooth but also tells a story of tradition and cultural richness. Whether enjoyed during a festive gathering or savored as a comforting treat, kunafa is a testament to the artistry and creativity found in Middle Eastern desserts. As you indulge in the layers of shredded pastry and the sweetness of the syrup, you partake in a delicious tradition that has been passed down through generations, connecting people through the love of good food.
Ingredients
For the Kunafa Dough:
- 500g kunafa dough (shredded phyllo dough)
- 1 cup unsalted butter, melted
For the Cheese Filling:
- 2 cups akkawi cheese, grated (you can also use mozzarella or a mix of mozzarella and feta)
- 1/4 cup sugar
- 1/4 cup heavy cream
For the Syrup:
- 1 cup water
- 2 cups sugar
- 1 tablespoon lemon juice
- 1 tablespoon rose water or orange blossom water (optional)
For Garnish:
- Chopped pistachios or slivered almonds
Preparation
1. Preparing the Kunafa Dough:
- Take the kunafa dough out of the package and gently separate the strands with your fingers.
- Place the shredded dough in a large bowl and pour the melted butter over it.
- Use your hands to evenly coat the dough with the melted butter.
2. Preparing the Cheese Filling:
- In a separate bowl, mix the grated akkawi cheese with sugar and heavy cream.
- Ensure that the sugar is well incorporated, and the cheese is evenly coated with cream. Set aside.
3. Assembling the Kunafa:
- Preheat the oven to 350°F (180°C).
- Take half of the butter-coated kunafa dough and press it into the bottom of a greased 9×13 inch baking pan to create a thin, even layer.
- Spread the cheese filling over the dough, ensuring an even layer.
- Cover the cheese with the remaining kunafa dough, pressing it down gently.
4. Baking:
- Bake in the preheated oven for 30-40 minutes or until the kunafa turns golden brown and crispy.
5. Preparing the Syrup:
- While the kunafa is baking, combine water, sugar, and lemon juice in a saucepan over medium heat.
- Stir until the sugar dissolves, then let it simmer for 10-15 minutes until the syrup thickens slightly.
- Remove from heat and add rose water or orange blossom water if using.
6. Finishing Touches:
- Once the kunafa is out of the oven, immediately pour the warm syrup evenly over it.
- Allow the kunafa to absorb the syrup for at least 10 minutes.
7. Serving:
- Cut the kunafa into 16 squares or diamond shapes.
- Garnish with chopped pistachios or slivered almonds.
8. Serving Tips:
- Kunafa is best enjoyed warm, so serve it shortly after preparing.
- Consider serving with a scoop of vanilla ice cream for an extra treat.
9. Storage:
- Store any leftover kunafa in an airtight container in the refrigerator. Reheat in the oven before serving.
10. Enjoy:
- Serve your homemade kunafa to family and friends, and relish in the delightful combination of crispy pastry, gooey cheese, and sweet syrup.
Making kunafa at home is a rewarding experience that brings the rich flavors of the Middle East to your table. Experiment with the filling and syrup to suit your taste preferences, and enjoy this delightful dessert with your loved ones.

Leave a Reply